Wow, I just looked at the calendar and we are just a little over a week away from school starting for a lot of the local kids. That is usually the sign of the end of summer for a lot of families, but according to the calendar we still have about a month of summer left. Still some of these mornings it’s starting to feel a little like fall. Get ready it is coming but you should still find time to enjoy these wonderful summer days.
Speaking of the end of summer, next weekend is Labor Day weekend and that means we are not going to be on the air. KOIN TV is required to air the US Open Tennis Championship and, for us, that is a day off. We will return on September 6th with a brand new show. Have a great holiday weekend!
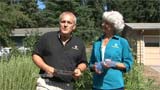
This week we featured...Summer Grasses
Grasses are one of the most overlooked plants in the garden. For most people they seem to be boring lacking color and fragrance, two of the most popular qualities that people are looking for. But if you are looking for structure and texture, grasses can be a great addition to any garden. To learn a little more about grasses we traveled to Molalla and stopped by ‘Out in the Garden’ Nursery (503-829-4141) to visit with owner Carol Westergreen. Carol grows a ton of great perennials and grasses are one of her favorite plants in the garden. She brought out close to a dozen different varieties for us to look at. We started with the golden colors of the Hakonechloa or Japanese Forest Grass. These are great ‘spillers’ which kind of flow over your garden. The varieties included ‘All Gold’, ‘Aureola’ and ‘Stripe it Rich’. All of these love morning sun and afternoon shade. Next we saw a great variegated plant called ‘Variegated Moor Grass’. Carol called this a hidden gem. Not a lot of people use it and that is a shame, because it is so easy to take care of. In the fall all you need to do for clean-up is pull the dead leaves off the plant and you are done! The next couple of plants were Reed grasses. The first was ‘Avalanche’ a variegated variety, right next to ‘Karl Forester’ which is more of a solid color. Both of these plants are larger structure plants in the garden. The bloom stalks are incredibly tall and beautiful even through the fall and winter. This plant will be one of the first to start in the spring and will be in bloom by mid-May in some cases. Buried behind the Reed grasses was a small Switch Grass called ‘Shenandoah’. This one has some great color. It starts the season as blue-green, but as the season progresses it gets redder in the leaves and taller, ending up around 4 feet tall. Finally we saw a hardy version of the favorite, purple fountain grass, Pennisetum ‘Karley Rose’. Like its less hardy cousin, this one has the great purple blooms, but will survive the cold to return year after year.
You can stop by anytime and visit Carol at the nursery, but this Saturday we recommend that you stop by Sebright Gardens (503-463-9615) in Brooks (exit 263 off I-5) to see Carol and the other 6 nurseries of the Cascade Nursery Trail. They will have some great food and even wine tasting to compliment all the wonderful plants!
Swan Island Dahlia Fest
The fields are blooming and the festival is on! If you have never been to the dahlia festival you have missed one of the most spectacular shows of the summer. 40 acres of blooms greet you as you drive up. But that is only part of it… Nick Gitts from Swan Island Dahlias (800-410-6540) showed us the different styles of dahlias and high-lighted a couple of the different varieties. We saw the different styles of flowers including pom pon, orchid, single, collarette, cactus, decorative, Waterlily, and laciniated. The Dahlia is one of the most versatile of blooms. We can’t think of another type of flower that can look so different! Nick also talked about things that the home gardener can be doing now to help their own dahlias. He recommended watching for spider mites. These tiny pest can start attacking your plant at the base and you may notice some yellowing of the leaves at the base of you plant. The other thing you can do is to give them lots of water right now and to ‘deadhead’ or remove the old blooms, the watering and deadheading will promote more growth and even more blooms!
He also filled us in the special events that they have planned for the 2 weekends of the festival. If you stop by on August 23, 24, 25, August 30, 31, and September 1 (Saturday, Sunday, and Monday) you will also get a chance to see over 15,000 blooms in 400 different cut flower arraignments. You can also enjoy food, music, cut flowers and informational talks to help you grow dahlias like the experts. And it is all free. Take some time to head down to Canby (not Swan Island) for the annual dahlia festival.
Veggie Mold
So you have wowed the neighbors with your fine collection of heirloom tomatoes. You have impressed your co-workers with the interesting cucumbers from your garden like lemon and stallion white. What can you do to impress them now??? We think we have found something that will really knock them off their feet, Veggie Molds! These are plastic molds, in the shape of stars and hearts, that you place over your young fruit and then sit back and let them grow. The fruit or vegetable will then grow into the shape of a star or a heart. It is completely natural and because the plastic is clear, you get to watch the whole thing happen right before your eyes. We showed you how to do it with cucumbers and tomatoes, but you can do it with just about any small to medium fruit or vegetable. We even have seen them on figs, kiwi, lemons and limes. When the fruit is ripe you can then take off the mold and slice them up to really liven up a meal, drink or salad! If you would like to try these molds you can order them with the Veggie Molds website at www.VeggieMold.com.
Summer Hostas
When you think of hostas you probably think of shade. And it is true that most hostas thrive in the shade, but there are some varieties that do well in the sunniest of locations as well. Sebright Gardens (503-463-9615) grows one of the largest selections of hostas in the U.S. and we stopped by to chat with Thomas about some varieties that he would recommend for the sun. First he mentioned that these plants will always do better if you have them in the right conditions, good soil and well watered. Thomas also brought up a point about the flowers on hostas. The more fragrant they are the more tolerant they are to sun. It is a characteristic of the species. Also about the blooms, they bloom on a stalk and in progression. You will get a new flower on the stalk every day and this will continue for over a month on some varieties. The sun loving hostas also continue to send up new leaf growth during the summer. So even if they do get a little sunburn, you can just cut those leaves off and more will grow back. Keeping that in mind we looked at his ‘religious’ themed hostas. It is funny, but they all have a religious type of name. The first one we looked at was ‘Praying Hands’. This one had thick leaves and a tight leaf structure that also had a small highlighted edge to it. Next, we move to a bright foliaged variety called ‘Stained Glass’. This one had a flower stalk on it and, with the bright foliage, it was a real knock out. The final one was called ‘Cathedral Windows’. This one had much larger leaves with a great texture to them. All these would look great in any summer garden!
Sebright is also part of the Cascade Nursery Trail sale this Saturday at their nursery. They are welcoming their nursery partners like Garden Thyme Nursery, Highland Heather, Nowlens Bridge Perennials, Out in the Garden Nursery, Secret Garden Growers and Wild Ginger Farm. Stop by, enjoy some tasty food and wine, and take home a great plant!
Pickling Cukes
Late summer is the time to think about preserving all the great flavors of the garden. We have done lots of stories about canning jams and jellies, but this week we tackle one of the most liked recipes for canning, pickles! William and Judy joined assistant producer, Therese, in the kitchen to walk you through the steps for canning cucumbers (or cukes, as we called them when we were growing up). This recipe is for dill pickles, but you can find similar recipes and techniques on the OSU Extension Food Preservation website, http://extension.oregonstate.edu/fch/food-preservation.
Here is what we did. First we got all our materials together so we didn’t have to stop once we got going. We started the process by cleaning the canning jars and then sterilizing them in boiling water. 4 jars fit in a 9 x 13 pan. We also sterilized the lids and rings in a pan. We put ¼ teaspoon alum or one grape leaf in the bottom of each jar. This is to help make the pickles crisp. Then we added one to two sprigs of fresh dill to each jar and a clove of garlic if desired. We then packed the jars full of cucumbers. Remember to keep the cucumbers just below the head of the jar so the brine can cover the cucumbers and allow a bit of room for the brine to boil during processing. Cover with sterilized lid and screw the lid on hand tight. Process the jars in a hot water bath canner for 15 minutes. The water should be boiling before adding the jars. Remove from canner and let cool. The jars will either have sealed in the canner or will seal as they cool. If the jar does not seal, the pickles can be stored in the refrigerator for a month before eating. You can remove the rings after the jars have sealed. Pickles are ready to eat after a month. (It’s a good idea to write the date on the top of the jar with a permanent marker.) They can be stored up to a year and a half. If you are interested in this recipe you can click here. If you are interested in preserving anything from the garden we recommend that you check out the OSU Extension Food Preservation website before you start to make sure everything you do is tasty AND safe!
Grilled Peaches
Along with all the other ripe fruits and vegetables right now are peaches. And one of the latest and tastiest ways to prepare them is on the grill. One of the places you find the best peaches is at Smith Berry Barn (503-628-2172). Before we got to the recipe we learned how to choose the best peaches at the store. Joelle said you should NEVER squeeze them. This is not a reliable way to test them and it will just bruise them in the process. You should just look at the top of the peach at the stem. If the area around the stem is green, or slightly green, then the peach is not ready. It should have the ‘ripe’ color all the way around the stem.
Then we started on the recipe. Take a ripe peach and cut it in half and remove the pit. Brush olive oil on the outside skin and the cut side of the peach. This is to keep it from sticking to the grill. She then sprinkled on some pepper and some Himalayan sea salt and they we ready for the grill. Rich was manning the grill and had it set for medium high. He also brushed on some olive oil to help prevent the sticking. He ended up grilling the peaches for 12 minutes on the cut faced side (to soften them and give them some grill marks) and about 5 minutes on the skin side. Once removed from the grill Joelle scooped some mascarpone cheese into the center of the peach, drizzled on some honey and topped it off with fresh basil cut with her special chiffonade scissors. It was divine!!!
If you would like to try this recipe on your own you can find everything you need at Smith Berry Barn. Stop by, pick up everything and then prepare to wow the family tonight at dinner!
|