|
Season 1 • Episode 12 - January 2, 2023
The coldest time of
the year is here and if you are like me you struggle to
find the motivation to get outdoors and get some garden
chores done. A lot of people think that there is not a
lot to do in the garden during the winter but we had Jan
McNeilan, retired Oregon State University Extension
Agent with us to dispel that myth. Lately we have been
outside cleaning up the storm damage and fallen limbs
from our fir trees, but she shared a bunch of other
chores that we can do right now that will help get our
gardens ready for the new growing season right around
the corner. That’s right. There are some things that you
can do now to help you deal with pests, have a better
harvest and help you enjoy healthier plants.

Jan showed up with a literal ‘book’ of tips. This was
written by Jan and her husband Ray, but was never
published. We knew that we couldn’t cover it all but we
discussed a few of the points. If you would like to have
more details or to get a more comprehensive list of
things to do,
check out the Oregon State University Extension website
for more details. We started by talking about winter
fruit tree pruning. Pruning is one of the hardest jobs
in the garden. A lot of gardeners are afraid of cutting
back their plants for fear of damaging them or possibly
killing the plant. This is especially true of fruiting
plants! Some believe that if you cut too much or at the
wrong time you can reduce your yield! That’s true, but
if you don’t prune, you can reduce your yield as well.
If you have an apple tree remember that apples fruit on
older wood. Fruit spurs are formed on wood that has been
cut back, forcing growth to these spurs. Pruning here is
to not only promote the highest quality fruit, but also
to increase the size of that fruit. An unpruned tree
will produce a lot of fruit, but it will always be small
and will probably all mature at the end of the branches
creating weight problems and possible damage to the
tree. What makes pruning easier is knowing the
difference between a leaf spur and a fruiting spur. A
fruiting spur looks like it has a wrinkled collar where
it attaches to the tree.
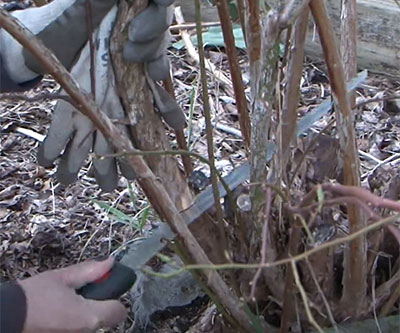 Raspberries
and blueberries are very popular fruits. If you have
them in your garden you might notice that they will
produce less and less over time. This is because of a
lack of pruning. The blueberry plant will continue to
produce vegetative growth (leaves and branches) as it
grows and all the plant energy will go into this ‘green’
growth. By pruning you will focus the plant on fruit
production instead. Take a survey of what you want to do
and visualize the end result. How tall and how wide do
you want the plant to be? Then go in and cut out the
diseased and broken canes. Next look for crossing
branches and remove those. You will need to limit the
heavy pruning to two or three mature canes. They are
generally an older brown color. Never remove more than a
third of the plant when cutting. Try to keep the base of
the plant narrow and open up the center of the plant to
promote airflow. This type of pruning will promote new
cane growth and more fruit in the future. You can tell
these newer canes by their brighter green color. Raspberries
and blueberries are very popular fruits. If you have
them in your garden you might notice that they will
produce less and less over time. This is because of a
lack of pruning. The blueberry plant will continue to
produce vegetative growth (leaves and branches) as it
grows and all the plant energy will go into this ‘green’
growth. By pruning you will focus the plant on fruit
production instead. Take a survey of what you want to do
and visualize the end result. How tall and how wide do
you want the plant to be? Then go in and cut out the
diseased and broken canes. Next look for crossing
branches and remove those. You will need to limit the
heavy pruning to two or three mature canes. They are
generally an older brown color. Never remove more than a
third of the plant when cutting. Try to keep the base of
the plant narrow and open up the center of the plant to
promote airflow. This type of pruning will promote new
cane growth and more fruit in the future. You can tell
these newer canes by their brighter green color.
For raspberries you will also look for those older canes
and remove them, focusing on saving the newer canes
which will carry all your new fruit in the coming
season. Be careful not to trim the newer canes. You
might be removing the fruiting spurs.
When you approach your grapes in the spring you may not
know where to start. There are so many vines that it is
hard to know where to make the cuts. Here you want to
look for the new buds. For the home gardener it could be
as simple as leaving two vines with four to five buds on
them. These buds will grow new canes and those canes
will grow your grapes. The key is to not be afraid of
cutting. Cutting (pruning) is the key to success. If
your vines start to bleed while you are cutting them,
don’t worry, that’s normal. It is caused by the warming
of the vines and they will seal up not long after you
finish cutting. Also, we recommend that you put your
vines in an area where they will receive a lot of
exposure to the sun. Grapes will survive very nicely
(once they are established) without a lot of
supplemental watering. In fact, the vines are not
watered at all during the late summer unless there is a
drought. This helps to create the sugars that make them
so sweet. You should also hold off on fertilizing the
vines. The fertilizer will only create more foliage on
the plant and that will limit the sunlight that can
reach the fruit.
What if your plant looks like a big mess with a ton of
vines (like a bad haircut)? Then you can cut a bunch
off and leave two larger vines to become trunks. From
those two ‘trunks’ you can leave upright vines with two
to three buds on each to produce your fruit for the
season. It is less intensive on the details and will
still give you a great harvest of fruit. Just follow
these simple rules and you should have a great crop of
grapes on your table this late summer and fall.
Then we moved to dormant spraying. If you have fruit
trees, now is the time to dormant spray before they
start to flower. Dormant spraying will help control
insects and diseases during the coming growing season.
There are a lot of different sprays and treatments that
you can use so be sure to check with your local garden
center to find the products that will work for you. We
talked to an expert once and he had a simple rule for
spraying your trees during the winter months:
Thanksgiving, Christmas and Valentine’s Day. If you
apply your dormant spray during those times you will
have the best chance of success. Some people prefer to
not apply any sprays at all and for them it is
recommended that you keep a close eye on your plants so
you can target problems before they get too big. A lot
of the commercial sprays will smother insect eggs,
preventing problems before they start. You can spray now
before the flower buds open. Once the flowers are open
you can let the pollinators go to work and get your tree
pollinated. Once the fruit has formed you can spray
again to prevent any other problems. When applying these
sprays, you will want a nice dry day with no wind.
 The
change of the seasons also signals a change for your
local bird populations. Some of the non-migratory birds
will be hanging around and may need a little help from
you to survive the cold and wet of winter. We started
with food. For seed eating birds you can use a black oil
sunflower seed. This is a good basic seed that provides
calories for high energy birds. For insect feeders you
can set out a suet cake. Use different types of suet to
attract different types of insect feeders. For most suet
feeding birds, they love insects and if you see a suet
block with seed it is generally used as a filler in the
suet. Once you have their food needs met, then you need
to think about water. You may want to take a look at
heaters to keep their water from freezing. You should
also remember to put out fresh water whenever you can,
since the birds prefer that over standing, dirty, water.
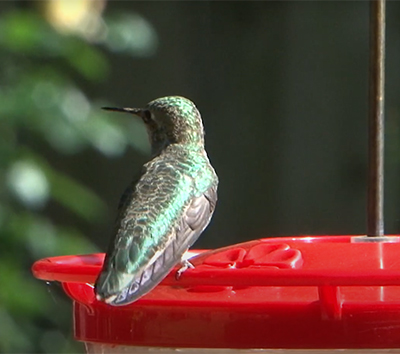
The one bird that has special needs in the winter is the
hummingbird. They use lots of calories and so their food
needs are more critical than other birds. You can keep
their nectar in the feeder fresh by changing it every
week or so. You can find a simple recipe for making
their nectar online at various sources including on the
OSU website, https://extension.oregonstate.edu/ask-expert/featured/tasty-hummingbird-feeder-recipe.
Plus, they need to have a nice clean feeder so they
don’t get sick over the winter. You can also welcome
birds to your garden by incorporating different types of
shrubs and trees. For a list of winter interest plants
you can check with your local garden center. To learn
more about attracting birds to your garden during the
winter you can check with
Backyard Bird Shop or
The Audubon Society of Portland. The
change of the seasons also signals a change for your
local bird populations. Some of the non-migratory birds
will be hanging around and may need a little help from
you to survive the cold and wet of winter. We started
with food. For seed eating birds you can use a black oil
sunflower seed. This is a good basic seed that provides
calories for high energy birds. For insect feeders you
can set out a suet cake. Use different types of suet to
attract different types of insect feeders. For most suet
feeding birds, they love insects and if you see a suet
block with seed it is generally used as a filler in the
suet. Once you have their food needs met, then you need
to think about water. You may want to take a look at
heaters to keep their water from freezing. You should
also remember to put out fresh water whenever you can,
since the birds prefer that over standing, dirty, water.
The one bird that has special needs in the winter is the
hummingbird. They use lots of calories and so their food
needs are more critical than other birds. You can keep
their nectar in the feeder fresh by changing it every
week or so. You can find a simple recipe for making
their nectar online at various sources including on the
OSU website, https://extension.oregonstate.edu/ask-expert/featured/tasty-hummingbird-feeder-recipe.
Plus, they need to have a nice clean feeder so they
don’t get sick over the winter. You can also welcome
birds to your garden by incorporating different types of
shrubs and trees. For a list of winter interest plants
you can check with your local garden center. To learn
more about attracting birds to your garden during the
winter you can check with
Backyard Bird Shop or
The Audubon Society of Portland.
We took a break to try and catch our breath and then we
tackled a few other subjects.
We then turned to talking about hardiness zones. We’ve
all seen them. Sometimes on plant tags, or on the table
signage in your local nursery; ‘Good to Zone 7’, or
something similar. This refers to a ‘Zone’ hardiness
designation that was developed many years ago by the
USDA. The ‘zones’ were a way that gardeners could find
out how low a temperature a plant could survive and
thrive in. That is the simplest explanation. A zone
refers to a range of temperatures where a plant will
survive. Each zone represents a 10 degree range. The
lower the zone, the colder the temperature range. For
example, parts of Alaska are a Zone 2 that means a
temperature range of -40 to -50 degrees. A plant needs
to be pretty hardy to survive those temperatures,
whereas San Diego could be a Zone 10, with a range of
30-40 degrees. If it gets below 30 degrees, a Zone 10
plant may not survive. Talk about your tropical plants!
That doesn’t mean that a Zone 2 plant will survive in
a Zone 10.
In the Willamette Valley we are in the Zone 8 (10-20
degrees) range. Eastern Oregon would be closer to a Zone
6 (-10 - zero). When you are buying a plant, a zone can
help you make the right decision on choosing a plant
that will survive in your garden. Pick the wrong zone
and you may be throwing your money away. To find out
your zone, you can
go to the USDA website. Then you can make an
informed choice when you go plant buying!
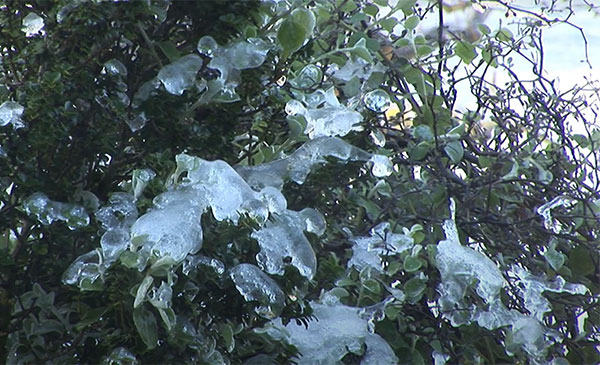
Speaking of zones, snow can still be a possibility in
our area. We talked about the recent snow of the past
couple of years and the problems it might create for the
gardener. These ‘events’ are mainly snow with little or
no frost. Snow events generally are not a big problem.
The snow actually acts as an insulator and helps protect
plants from frost damage. The only problem with snow is
the weight. If we get a good amount, it can knock down
trees and branches, doing damage to large plants in your
garden. If we had a hard frost, then you would see
significant damage to your landscape plants. Even with
small events, some of the new growth on your plants
might show some damage when it warms up, but wait to see
if you DO have damage before you do any cutting or
pruning. Your spring bulbs will be fine with this cold.
They are used to this type of weather. Cold weather is a
reminder though that you should wait to plant some of
your tender garden plants until the soil temperature
gets warmer, around 50 degrees. Otherwise, your plants
will just sit there and do nothing, or they may die.
Even if the day is sunny and warm, it is better to wait
for the soil to catch up. Jan marks her seed packets
with the temperature they need for germination. For some
it could be 40 degrees, for others it could be 60. By
doing this, she gives her seeds the best chance for
surviving. You can still put your cold weather/early
season crops in right now including potatoes, peas and
lettuce.
One extra thing that we talked about was watering. Yes,
even in the winter you may need to water your plants,
especially those that are under your eaves or are in
protected areas. Water them well during the warmer days
and they will be well hydrated and ready to survive
those cold drying winds during the toughest of storms.
If you are worried about your lawn you should remember
that grass blades can survive the coldest of
temperatures, but walking on them when they are covered
with frost is probably not a good idea. Frozen blades of
grass can become damaged and when they do it will weaken
your lawn and open up the possibility of weeds getting a
start. Applying fertilizers is not a good idea either
since it is too cold for the plants to take up the
nutrients that you are applying. Check the label to see
the recommended temperature for application.
As we approached the end of the podcast we talked about
planting in the winter and landscape design. Jan
recommended that you find the window that you look out
most frequently and plant for that view. Then when you
are stuck inside you can look out and enjoy the small
but beautiful view. For Jan that was her kitchen window.
She has a nice variety of plants that are beautiful and
also nature friendly so she can enjoy the local fauna.
We then moved to pests. You may see them inside your
home during the winter. They are just like us and are
looking for a warm and dry place for a few months.
Seeing them indoors also may mean that they are outside
in your garden too. There are a few things you can do
now to reduce your pest problems especially slugs, moths
and ants. When we get a nice extended cold spell (which
we just had) then you will start to see the pest
population drop. Sub-freezing temps will get rid of a
lot of garden pests and their eggs, reducing your
problems. Baiting outside right now is not a good idea.
The cooler outside temperatures are not good for any
baits to work to their full potential, plus the rains
will wash the baits away at a quicker pace than normal.
Wait until the weather warms a bit before baiting
outside for your slugs. Baiting for slugs earlier in the
season will lessen the eggs they lay. A slug can lay
over 100 eggs, so reducing them in the late winter or
early spring is very beneficial. Stink bugs can also
appear inside during the cold weather. You can squash
them or scoop them up and put them outside. Ants come
inside too. Using a borax product or barrier product can
help reduce their populations. Eliminating the food
source that they are attracted to will also help get rid
of them. A food source is where you will also find the
pantry moth. These little guys get into your cereals,
grains, and nuts and move quickly to many other foods.
Jan has used a pheromone lure to trap the males and
eliminate the populations. Once gone, throw out the
foods that they have infected and seal up any remaining
containers.
We ended up talking about wood ash too. A lot of people
will spread wood ash from their fireplaces or woodstoves
in their garden. It is good to remember that using a lot
of ash can change the pH of your soil. It is recommended
to spread wood ashes evenly on your vegetable garden.
Use no more than 1.5 pounds per 100 square feet per
year. Don’t use if the soil pH is greater than 7.0 or if
potassium levels are excessive.
The winter is the time for planting too. Seed and plant
catalogues are arriving in your mail, so it is a good
time to start planning your garden for the coming year.
While it is still fresh in your mind, write down areas
in your garden that didn’t perform well and make changes
to help the plants in those areas or look at replacing
those plants. Jan also told us about selecting plants
that don’t overwhelm you. She told us about planting
rutabagas because she liked them but not knowing how
much time and effort it would take to grow them. That
was a real learning experience.
Just know that even when you plan for the coming season,
things change. No two seasons are alike. Still, winter
is a great time to at least get started on your garden
and we hope these tips help you get started.

PODCASTS
2022
• Return to Current Year Podcast List
|